Building a Desk
My latest project has been to build myself a desk. I was tired of using the tiny desk I had from my college apartment or the coffee table in the living room. I needed something that would have a lot of desk space (for tinkering) and a lot of storage space (to control clutter). Also it couldn’t be too ugly because, unlike most of my projects, it was going in the house! As usual when I start out on a project, I do some research to see what is available commercially. I found everything to be either too small, too flimsy, way too expensive, or just too ‘fancy’ for my liking. This research gave me a lot of ideas about what my desk should be like.
Design
I started the design by measuring EVERYTHING I could think of. I measured desktop sizes, door widths, computer and monitor dimensions, shelf and drawer sizes, and the room I put the desk in
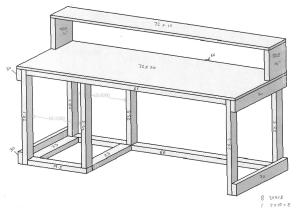
Taking everything into consideration I started with some rough sketches, and from the sketches created a model. Basically a desktop with a monitor riser/shelf on the back and sitting on a base with storage on one side. I planned on putting a bottom shelf and a mid shelf inside the square base and closing the ends with plywood. I didn’t model those parts to save time.
I went through this first model and developed a bill of materials (BOM) to get an idea of what this was going to cost.
| Desk 1 | |||
| QTY | Item | Unit | Sub Total |
| 8 | 2x4x8 | 3.19 | 25.52 |
| 1 | 2x10x8 | 8.25 | 8.25 |
| 1 | 4x8x15/32 Pine Plywood B-C | on-hand | 0 |
| 1 | 4x8x3/4 Maple Plywood | 47.85 | 47.85 |
| Total: | 81.62 |
I was pretty happy with this cost, but the more I looked at the design the less I liked it. It was lacking good storage space and it just looked a bit plane and boring.
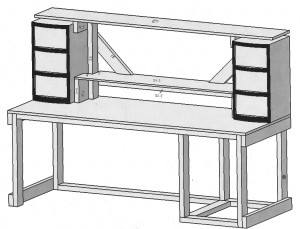
I went back to the (virtual!) drawing board and came up with this:
Now it’s really starting to look like something! I thought to add some storage drawers on the sides and a large shelf all the way across the top. During my research I saw people using hollow core interior doors for desktops. I looked into this and realized it would save $19 and make the desk lighter (easier to move). I decided on a 30x80in door which was a bit larger than I originally planned but it turned out to be a really good size. Since this was really starting to look like a desk I decided to paint and stain it and give a nice finished look. I made a second BOM and went shopping.
| Desk 2 | |||
| QTY | Item | Unit | Sub Total |
| 9 | 2x4x8 | 3.19 | 28.71 |
| 1 | 2x8x8 | on-hand | 0 |
| 1 | 11.5×8 MDF Shelf | on-hand | 0 |
| 1 | 30×80 Interior Door | 29 | 29 |
| 1 | 1x12x8 | 13.26 | 13.26 |
| 1 | 1x2x8 | 2.87 | 2.87 |
| 1 | 4x8x15/32 Pine Plywood B-C | on-hand | 0 |
| 2 | 1×5 steel tie plate | 0.57 | 1.14 |
| 1 qt | Stain | 7.77 | 7.77 |
| 1qt | Polyurethane Sealant | 10.77 | 10.77 |
| 1qt | Interior latex paint | 10.97 | 10.97 |
| 1 | Staining pads | 2.99 | 2.99 |
| 1 | Paint brush for sealant | 1.48 | 1.48 |
| 1 | Better paint brush | 5.97 | 5.97 |
| 2 | drawer sets | 11.88 | 23.76 |
| Many | Misc. screws | on-hand | 0 |
| Total: | 138.69 |
When I started out I had in mind spending less than $100, but $138.69 compared to a desk this size available commercially is still a really good deal!
Build
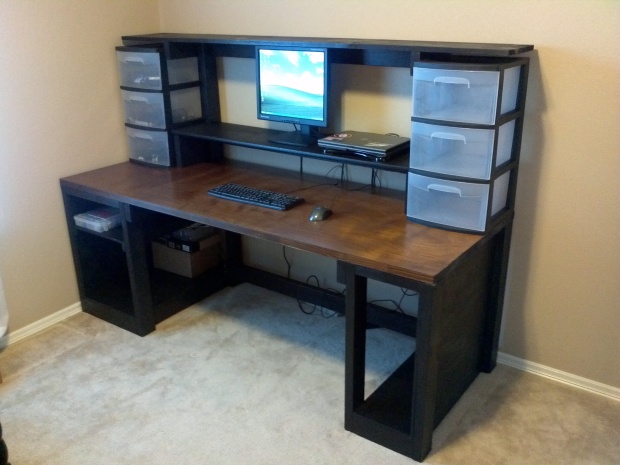
Ok time to get to work! You can see in the pictures I changed a few things from the model. I decided I wanted a place to put the CPU instead of having it on the floor so I built a smaller base on the other side from the storage base. Also I switched the sides of the small/large bases because I decided to put the desk in another area and felt this orientation would be the best. Once the build was completed I stained the door/desktop and painted everything else with black semi-gloss latex paint.
Once the build was completed I stained and sealed the door/desktop and painted everything else with black semi-gloss latex paint.
Final Product:
Here’s what I ended up with. I’m very happy with how it turned out!
Xterra Sleeping and Storage Platform Part 1
The Xterra Sleeping and Storage Platform came about because we really like going camping, but we REALLY don’t like setting up and taking down a tent. Especially when it’s windy or raining.
My Nissan Xterra makes a great camping vehicle. It has just enough room for our gear and the dog and does a good job to get us well off the beaten path where we can find some peace and quiet. This is a way to make it an even better camping vehicle. The inspiration for my design came from the Expedition Portal Forum where several members there have built similar platforms.
Besides a flat surface for sleeping on, I needed a better way to store, secure, and organize our camping gear. Stacking and piling the gear into the Xterra was less than ideal.
The requirement of a comfortable and safe place for our dog to ride added some complexity, as did an area where I could install a dual battery system and other electronic equipment.
In part 1 I will discuss the structure of the platform. In part 2 I will discuss the systems installed.
So, let’s get into the construction!
The first thing I did was pull out the back seats and carpeting to see what I had to work with. I found I could use many of the factory mounting points to mount the platform. I made aluminum brackets to anchor the frame to the seat mounts and steel L brackets to anchor to the rear tie down points. This pictures shows the Aft Frame installed. It is made of 2×8. Note the anchor points on the front and rear.
I chose to use solid 2×8 wood for the aft frame because this will bear most of the cargo weight and provides a solid frame to mount tie down points to. Aluminum square tubing would be an ideal material for the platform frame (strong and light weight) but comes with increased cost and I don’t have a TIG welder. 80/20 Materials could be used without a welder, but at even higher cost. Based on my limited budget, wood was the best choice.
I originally intended to build drawers on ball bearing sliders in the space between the frame rails. After pricing 36″ travel heavy duty drawer sliders and the materials required to build the drawers I decided to go another route.
I found these containers that fit within 0.5in! Problem solved!
With the Aft Frame installed I began work on the Forward Frame.
The Forward Frame is made of 2×4. The spacing of the platform beams was determined by the area I needed for the dog area (large area on passenger side I call the Dog Deck). The smaller area on the drivers side is the equipment bay. The Forward Frame is supported by legs which attach to plywood pads on the floor. The pads are attached to the seat mounts using stainless steel aircraft cable. Wit the frame built it was time to start on the platform deck. The Dog Deck and the equipment bay share a common plywood sheet divided by another piece of plywood.
Next was the Forward and Aft Decks
The hinged panels (passenger side panel not shown) are required to slide the containers in and out due to the curvature of the Xterra floor. The Forward Deck is hinged to allow access to the equipment bay.
With the decks completed I put padding on the Dog Deck and installed the Dog Deck lid
The dog deck lid is double hinged due to the roof height. When the deck lid is stored it bolts to a large L bracket. This makes a nice barrier to prevent gear in the back from sliding into the Dog Deck. When the lid is deployed it completes the sleeping platform.
Here is the completed Sleeping and Storage Platform with tie downs installed and some gear loaded.
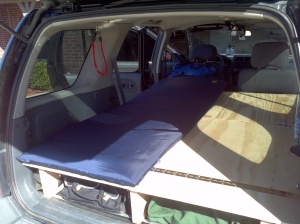
This is how we sleep on the platform. I use a Crazy Creek chair to extend my side of the bed. My wife fits well with no extension required.
Another view with a drawer open. Note the hinged panel does not have to be opened all the way to remove the drawer. It only has to open a few degrees so it is easy to access the storage area even when the cargo deck is fully loaded or we have the bed set up.
This concludes Xterra Sleeping and Storage Platform Part 1 where I discussed how I built the structure of the platform and integrated the storage drawers. In Part 2 I will show how I installed equipment in the platform. Stay tuned!


